Since version 11.10 (release October 2011), Ubuntu uses Lightdm as its main login screen. In the standard version this screen comes with a fairly nice Ubuntu background and an Ubuntu 11.10 logo in the bottom left corner. If you want to personalize the login screen to your liking, change the logo or both, this can be easily done
This involves changing 1 configuration file and copying 2 images to a folder, that’s all. There are however a few things that you need to take into account or you’ll end up with a black screen without a logo, or in worst case the inability to login to Ubuntu. And we don’t want that.
Changing unity-greeter.conf
 The first thing you’ll want to do is to locate the unity-greeter.conf file. This file can be found in the /etc/lightdm/ folder. Since this file is in the /etc folder it is not writeable by a normal user. So open up a console (via the menu or by pressing CTRL+ALT+T) and enter following commands:
cd /etc/lightdm
sudo cp unity-greeter.conf unity-greeter.conf.bak
sudo nano unity-greeter.conf
The first command will make sure we are in the correct folder. The second line makes a backup of the file before we edit it. The third line opens the file with the nano editor (you can use vi or vim if you like it better)
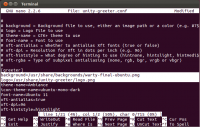
The lines we are looking for are:
background=/usr/share/backgrounds/warty-final-ubuntu.png
logo=/usr/share/unity-greeter/logo.png
This is pretty self-explanatory. The first line tells the loader where to find the background file, the second line defines the logo location.
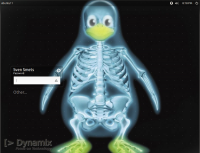
For the sake of this tutorial I will replace the Ubuntu background with a nice penguin called tux.png and the Ubuntu logo with my own Dynamix logo called dynlogo.png.
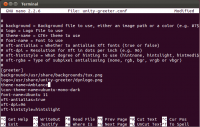
Make the following changes to unity-greeter.conf:
background=/usr/share/backgrounds/tux.png
logo=/usr/share/unity-greeter/dynlogo.png
Save the file and exit the editor. Leave the terminal open for now.
A new background and logo
I’ll assume that both tux.png (the background) and dynlogo.png (the logo) are located in the pictures folder of the current user. We’ll need to place them in a location that is accessible at boot time. Since the /home folder is not accessible before logging in, I suggest to copy the files to the location of the original files:
- /usr/share/backgrounds/ for the background
- /usr/share/unity-greeter/ for the logo
Jpeg files will not display. Higher pictures will simply be cropped by the screen loader
Let’s copy tux.png to /usr/share/backgrounds/ and dynlogo.png to /usr/share/unity-greeter/ (replace USERNAME with your actual user name):
sudo cp /home/USERNAME/Pictures/tux.png /usr/share/backgrounds/
sudo cp /home/USERNAME/Pictures/dynlogo.png /usr/share/unity-greeter/
We have to use sudo because /usr/share is not writable for a normal user.
Now that we have edited the config file and copied both files to their proper locations, we can safely log out and admire the changed login screen.
Remove the guest login
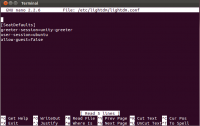
 This time we simple need to add a line to the lightdm.conf file. This file is also located in /etc/lightdm.conf. Open a terminal (CTRL+ALT+T or via the menu), change to the directory, make a backup cop and open the file in an editor.
cd /etc/lightdm
sudo cp lightdm.conf lightdm.conf.bak
sudo nano lightdm.conf
Add the line allow-guest=false below the last entry and save the file.
Note that this change requires a reboot to become visible. Enjoy your new login screen:
Related posts:
- Switching To Linux: Ubuntu, The Surprising Winner Chapter 9. When I started the testing I would have never...


Sorry, the comment form is closed at this time.